How to setup Vercel Postgres Serverless SQL Storage using NextJS
I have been using planetscale to store tweet count and github metrics to display on my portfolio and it took me about 30min to switch it all over.
Assumptions
- You have a free or pro/enterprise account with Vercel.
- You have a project already setup and working in Vercel OR you are familiar with how to get your project linked using Vercel's CLI or linking your GitHub Repository.
- You are familiar with nextJS 13/React Frameworks.
Dependencies needed
- kysely: (pronounce “Key-Seh-Lee”) is a type-safe and autocompletion-friendly typescript SQL query builder.
npm i kysely- @vercel/postgres-kysely - A
@vercel/postgreswrapper for the Kysely query builder.
npm i @vercel/postgres-kysely- Vercel CLI (optional) - See step 4 below; Retrieve latest ENV variables for your development environment.
npm i -g vercel- Vercel Documentation - https://vercel.com/docs/storage/vercel-postgres
1 - Create a Database
-
Log into your vercel dashboard and select
Settingsfrom the navigation menu:
-
Select
Create Database
-
Ensure
Postgres Serverless SQLis selected and clickContinue
-
Accept the Vercel Postgres Beta terms and conditions

-
In the Database Name field type in the desired name of your new database. In the Region field select the region where your database reads and writes will take place. Select
Create
2 - Connect your database to a project
-
Select
Connect Project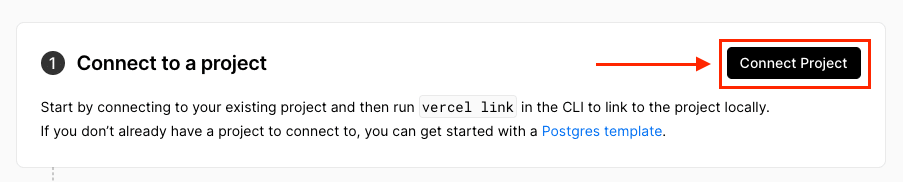
-
In the
Select Projectdrop down choose an existing project and selectConnect. This will create all the ENV variables for you in the vercel project you chose.
NOTE: If you don't have a project then you'll need to select cancel and create a new vercel project and come back to this step.

When you select connect vercel will automatically add the env variables to your project in Vercel.
3 - Create your tables
I have two tables setup in my database. One to store my tweet counts and the other to store my github metrics:

- In the Vercel Database Menu select Data
- Select Query
- In the black console window input your table you'd like to create (examples of my tables below)
- Select Run Query
Table Examples:
githumbmetrics:
CREATE TABLE githubmetrics (
	id SERIAL PRIMARY KEY,
	commits INTEGER,
	repos INTEGER,
	updated_at TIMESTAMP DEFAULT NOW()
);
tweetcount:
CREATE TABLE tweetcount (
	id SERIAL PRIMARY KEY,
	count INTEGER,
	updated_at TIMESTAMP DEFAULT NOW()
);
Next we will get the ENV variables for your development environment.
4 - Retrieve latest ENV variables for your development environment
There are two ways to get your env variables: 1) From the Vercel Database Dashboard. 2) From the Vercel CLI.
Vercel Dashboard

- From the Vercel Storage Dashboard, in your Database, Select .env.local
- Select Copy Snippet and paste the env variables to your local .env file
Vercel CLI
-
If you do not have your project linked follow the steps here.
-
From the root of your project you just linked, in the command line, run
vercel env pull .env.development.local -
If needed you can copy any ENV variables starting with _POSTGRES__ to your
.envfile.
5 - Create a helper file in /lib
The /lib/vercel-storage.ts file will hold the code for the Kysely ORM to connect and query the postgreSQL database. I'll talk through the code and then provide the full code at the end of this step.
import { Generated, ColumnType } from 'kysely'
import { createKysely } from '@vercel/postgres-kysely'

// define types
type Database = {
	tweetcount: TweetCountTable
	githubmetrics: GitHubMetricsTable
}

type TweetCountTable = {
	id: Generated<number>
	count: number
	updated_at: ColumnType<Date, string | undefined>
}

type GitHubMetricsTable = {
	id: Generated<number>
	commits: number
	repos: number
	updated_at: ColumnType<Date, string | undefined>
}

type MetricsType = {
	tweetCount: number
	githubCommits: number
	githubRepos: number
}

const db = createKysely<Database>()
In this first section I setup the types for my tables and database along with what's expected for when I fetch metrics. I then setup db to create an instance connection to my database in vercel.
In this next section I will create the queries to fetch and write data.
// query to fetch tweet count and github metrics
export async function getMetrics(): Promise<MetricsType> {

const res = await db
	.selectFrom(['tweetcount', 'githubmetrics'])
	.select([
		'tweetcount.count as tweetCount',
		'githubmetrics.commits as githubCommits',
		'githubmetrics.repos as githubRepos',
	])
	.execute()

return res[0]
}

// update tweet count
export const updateTweetCount = (tweetCount: number) => {
	db.updateTable('tweetcount')
		.set({ count: tweetCount })
		.where('tweetcount.id', '=', 1)
		.executeTakeFirst()
}

// update github metrics
export const updateGithubMetrics = (commits: number, repos: number) => {
	db.updateTable('githubmetrics')
		.set({ commits: commits, repos: repos })
		.where('githubmetrics.id', '=', 1)
		.executeTakeFirst()
}
In this last section I have three queries. 1st query is what I use to fetch from the database for both my tweetcount and githubmetrics. I use the MetricsType defined in the first section. The 2nd query is what I use when I write the updated tweetcount to the database and finally the query to update githubmetrics to the database.
Here is the complete code for vercel-storage.ts:
import { Generated, ColumnType } from 'kysely'
import { createKysely } from '@vercel/postgres-kysely'

// define types
type Database = {
	tweetcount: TweetCountTable
	githubmetrics: GitHubMetricsTable
}

type TweetCountTable = {
	id: Generated<number>
	count: number
	updated_at: ColumnType<Date, string | undefined>
}

type GitHubMetricsTable = {
	id: Generated<number>
	commits: number
	repos: number
	updated_at: ColumnType<Date, string | undefined>
}

type MetricsType = {
	tweetCount: number
	githubCommits: number
	githubRepos: number
}

const db = createKysely<Database>()

// query to fetch tweet count and github metrics
export async function getMetrics(): Promise<MetricsType> {

const res = await db
	.selectFrom(['tweetcount', 'githubmetrics'])
	.select([
		'tweetcount.count as tweetCount',
		'githubmetrics.commits as githubCommits',
		'githubmetrics.repos as githubRepos',
	])
	.execute()

return res[0]
}

// update tweet count
export const updateTweetCount = (tweetCount: number) => {
	db.updateTable('tweetcount')
		.set({ count: tweetCount })
		.where('tweetcount.id', '=', 1)
		.executeTakeFirst()
}

// update github metrics
export const updateGithubMetrics = (commits: number, repos: number) => {
	db.updateTable('githubmetrics')
		.set({ commits: commits, repos: repos })
		.where('githubmetrics.id', '=', 1)
		.executeTakeFirst()
}
I can then call the queries from the components in my application that need the information.
NOTE: I use Vercel Cron Jobs to fetch updated metrics from Twitter and GitHub and write to my database. You can checkout how I did it here
6 - Fetch and Display data on your application
import { getMetrics } from '@/lib/vercel-storage'

type MetricsType = {
	tweetCount: number
	githubCommits: number
	githubRepos: number
}

export const revalidate = 60 // In seconds

export default async function About() {

	const metrics: Promise<MetricsType> = await getMetrics()

	return (
		...
	)
}
Here is a snippet of how you would fetch the metrics. Note how I am revalidating the data every 60 seconds to ensure the latest metrics are shown on my about page.
The ... in my return function is where your application code would be and then you can call the data returned from getMetrics() using the variable metrics.
You can see how I implemented this in my portfolio at my GitHub Repo
Summary
I hope this tutorial was helpful. If you have any questions please feel free to comment below.